By Muthu Kumaran - June 20, 2017
PART 1: No Components, No State Management, just a simple Todo App.
If you are new to Vue.js, you can get started from the official Vue.js site. If you know JavaScript, it wouldn't take much time to get started.
Note that Vue.js only supports ES5-compliant browsers (IE8 and below are not supported).
Update:
First, let's just build a simple hello world using Vue.js to understand how Vue works. Here's the step by step
Create an index.html and include Vue.js file
<script src="https://unpkg.com/vue"></script>and the markup
  <div id="app">
    <p>{{ message }}</p>
  </div>
Create a Vue instance with Vue constructor to print Hello World! in the page,
var app = new Vue({
  el: '#app',
  data: {
    message: 'Hello World!'
  }
})
el - provide the DOM element to mount. Accepts CSS selector or HTMLElement. Let's mount by providing div ID #app.
data - The data object for the Vue instance. This should be an object. Vue will convert this property into reactive property.
To know more about the syntax, visit Vue.js docs The Vue Instance and API reference
Now open the index.html in the browser and you should see Hello World! message.
See the Pen Hello World - Vue.js by Muthu Kumaran (@mkumaran) on CodePen.
That's all about Hello World! App. Now let's build a simple Todo app.
In Todo App, we are going to implement the following
Note: In this demo, I won't be using Components or State Management. I'll cover those in another article. This is a simple Todo App with Vue.js
Create a simple HTML and Vue instance
<script src="https://unpkg.com/vue"></script>

<div id="todoApp">
  <h3> {{message}} </h3>
  <form name="todo-form" method="post" action="">
    <input name="add-todo" type="text" />
    <button type="submit">Add</button>
  </form>
</div>
var todoApp = new Vue({
  el: '#todoApp',
  data: {
    message: 'Welcome to Todo App',
  }
})
See the Pen Add Form - Demo Todo App - Vue.js by Muthu Kumaran (@mkumaran) on CodePen.
v-model
Use v-model to create a two-way data binding for the input textbox. Whenever we type into the textbox v-model will automatically update Vue data object.
Now update the <input> textbox with the v-model
<input name="add-todo" type="text" v-model="addTodoInput"/>
Also we need to add the v-model name to Vue data object
var todoApp = new Vue({
  el: '#todoApp',
  data: {
    message: 'Welcome to Todo App',
    addTodoInput: '' // <--- add here
  }
})
For testing out two-way data binding, lets put {{addTodoInput}} anywhere in the markup. Whenever I type, input value will print in the browser like a live update.
Go ahead and type something in the below codepen,
See the Pen Add Form - Demo Todo App - Vue.js by Muthu Kumaran (@mkumaran) on CodePen.
To learn more about inputs and forms, visit Vue docs Form Input Bindings
Event Handling was made very easy in Vue.js. Use v-on directive to bind events.
        //For eg,

        // <!-- simple click event -->
        <button v-on:click="someMethod"> </button>

        // <!-- shorthand for v-on: -->
        <button @click="someMethod"> </button>

        <form v-on:submit="submitForm($event)"> </form> //$event is a special variable similar to `event` in JavaScript

        // <!-- the submit event will no longer reload the page -->
        <form v-on:submit.prevent="onSubmit"></form> //`.prevent` is a event modifier which is same as `event.preventDefault()` and `.stop` for event.stopPropagation()

        // <!-- modifiers can be chained -->
        <a v-on:click.stop.prevent="doThat"></a>

        // <!-- the click event will be triggered at most once -->
        <a v-on:click.once="doThis"></a>

        // <!-- event will triggered on hitting <enter> key -->
        <input v-on:keyup.enter="submit">

        // <!-- same as above and triggered when the keyCode is 13 -->
        <input v-on:keyup.13="submit">

        // <!-- Alt + C -->
        <input v-on:keyup.alt.67="clear">
There are more about events and event modifiers. See Vue docs Event Handling
Back to Todo app, let's add onsubmit event to the <form> tag and we will add .prevent which does is event.preventDefault()
<form name="todo-form" method="post" action="" v-on:submit.prevent="addTask">
addTask is method to create new todo's. Let's create this method in Vue instance,
lists is a Vue data object, to store all Todo's items. Let's add that one to data object.
var todoApp = new Vue({
  el: '#todoApp',
  data: {
    message: 'Welcome to Todo App',
    addTodoInput: '',
    lists: [], // this will hold all the created todo task items
  },
  methods:{
    addTask: function(){
      //form submit action goes here
    }
  }
})
This is my lists structure,
      [
        {
          id: 1,              // Unique identifier
          title: 'Go Home',   // Todo's title
          isComplete: true    // Default: false. Mark as complete with a strike-through. We will see this later
        },
        {
          id: 2,
          title: 'Pack Bag',
          isComplete: false
        }
      ]
Now let's make the form submit using addTask() and add the new item to the lists
I've updated the addTask() method to update the lists reactive property
addTask: function(){

  this.lists.push({
    id: this.lists.length+1,
    title: this.addTodoInput,
    isComplete: false
  });

  this.addTodoInput = ''; //clear the input after successful submission
}
Check here in the codepen. You should able to add new Todo's,
See the Pen Form Submit - Demo Todo App - Vue.js by Muthu Kumaran (@mkumaran) on CodePen.
I know there is nothing happens after hitting the "Add" button. But in the background lists is getting updated with newly added todo items. Let's check in the codepen console (Make sure you are inspecting on codepen result/white area)
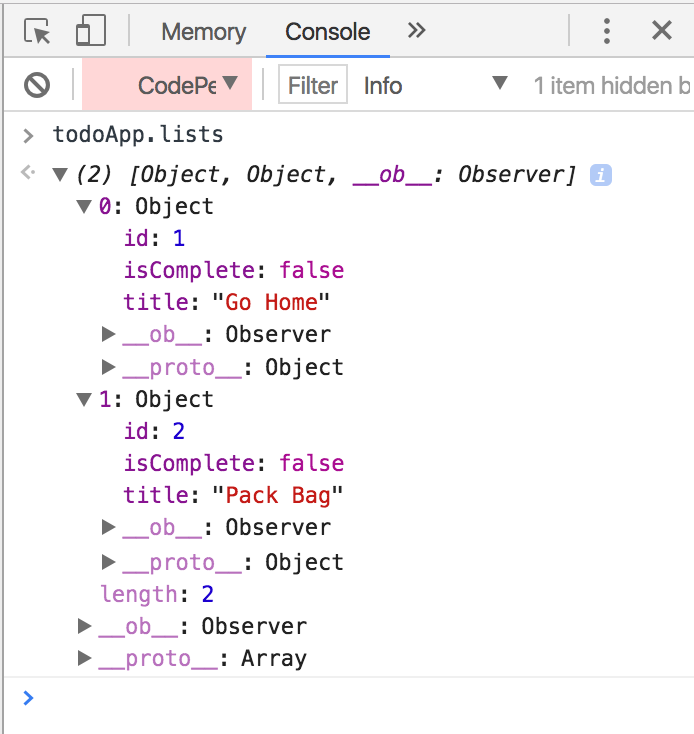
You can see items are getting updated in the items. Next step is to list all Todo Items in the page.
We can use the v-for directive to render a list of items based on an array (you can iterate objects). The v-for directive requires a special syntax in the form of list in lists, where list is the source data array and item is an alias for the array element being iterated on:
<li v-for="list in lists" :key="list.id">
:key - It is recommended to provide a key with v-for if you are updating the lists. key is not needed if it's a simple loop.
Let's update the markup to list all todo items,
        <div class="todo-lists" v-if="lists.length">
          <h3>My Todo Tasks</h3>
          <ul>
            <li v-for="list in lists" :key="list.id">
              <span class="title" v-bind:class="{completed: list.isComplete}">{{list.title}}</span>
            </li>
          </ul>
        </div>
Go ahead and see it yourself,
See the Pen List all items - Demo Todo App - Vue.js by Muthu Kumaran (@mkumaran) on CodePen.
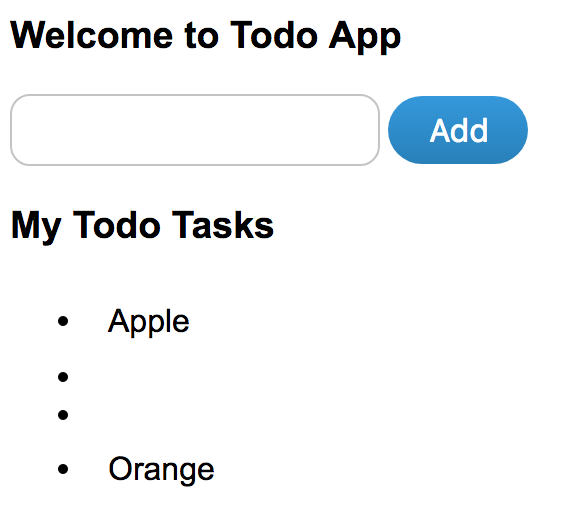 This works cool but we have an issue here. There is no validation when adding new todo items even
 empty items are appearing in the list. So lets a simple validation and make sure empty are not getting submitted.
When we hit the Add button without typing anything into textbox then we will show a red border textbox which will indicate textbox must be filled. I'm adding a new property called hasError in Vue data object to track textbox is filled or not
  data: {
    message: 'Welcome to Todo App',
    addTodoInput: '',
    lists: [],
    hasError: false  // <-- to handle errors
  },
Update the addTask method to update hasError property,
  addTask: function(){

    if(!this.addTodoInput){ // <--- If no value then we are setting error to `true`
      this.hasError = true;
      return;               // <--- stops here
    }

    this.hasError = false; // <--- If textbox is filled then setting error to `false`

    this.lists.push({
      id:this.lists.length+1,
      title: this.addTodoInput,
      isComplete: false
    });

    this.addTodoInput = '';
  }
Let's update the textbox to show red border when we simply hitting the button. We will use v-bind:class to attach error class,
<input name="add-todo" type="text" v-model="addTodoInput" v-bind:class="{error: hasError}"/>
Now check out this codepen, you should able to see the simple validation,
See the Pen List all items - Demo Todo App - Vue.js by Muthu Kumaran (@mkumaran) on CodePen.
To update the existing create Todo item, let's update the markup
        // Updating this <span> tag
        <span class="title" v-bind:class="{completed: list.isComplete}">{{list.title}}</span>

        to

        <span class="title"
          contenteditable="true"
          v-on:keydown.enter="updateTask($event, list)"
          v-on:blur="updateTask($event, list)"
          v-bind:class="{completed: list.isComplete}"> {{list.title}} </span>
I'm using contenteditable="true" to edit the field which was easier than putting a textbox. I'm trying to mimic <span> tag as textbox which I able to do it with the help of CSS and JavaScript.
v-on:keydown.enter - This event will trigger when hitting the ENTER key and execute updateTask() method.
v-on:blur - This event will trigger during blur and execute updateTask() method.
Let's add updateTask to Vue methods and update the edited list.
        methods:{
          ...
          ...
          updateTask: function(e, list){
            e.preventDefault();
            list.title = e.target.innerText;
            e.target.blur();
          }
        }
Here's the demo in codepen and now try editing the item from the Todo list,
See the Pen Update items - Demo Todo App - Vue.js by Muthu Kumaran (@mkumaran) on CodePen.
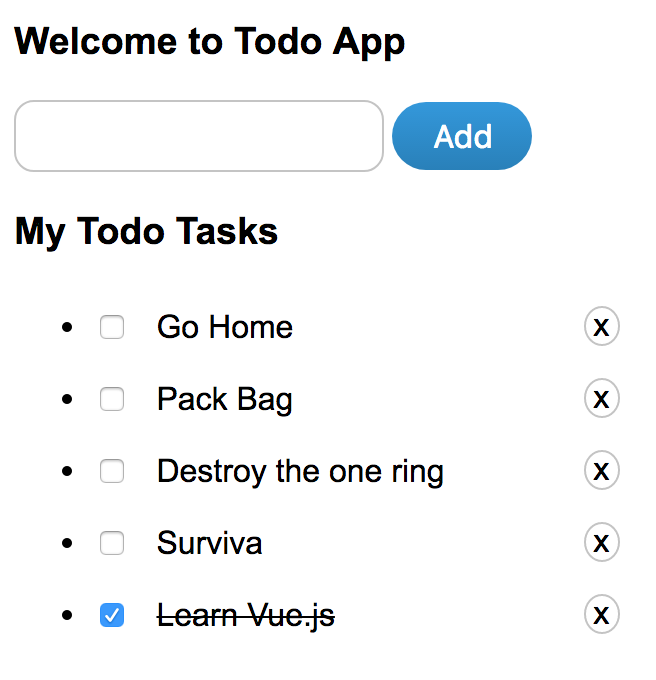
This is another feature I like to add to Todo app. If the task is complete let's strike out the completed task.
Let's add a <checkbox> to each Todo item task. When checking the <checkbox> will strike-out the task.
        <li v-for="list in lists" :key="list.id">
          <input type="checkbox" v-on:change="completeTask(list)" v-bind:checked="list.isComplete"/>
        ...
        </li>
We have attached completeTask method to change event which will update list.isComplete to true/false.
v-bind:checked - will check or uncheck checkbox based on the condition of list.isComplete
Adding completeTask to Vue methods,
        methods:{
          ...
          ...
          completeTask: function(list){
            list.isComplete = !list.isComplete;
          }
        }
Here's the demo in codepen and now try checking the checkbox in Todo list,
See the Pen Mark as Complete - Demo Todo App - Vue.js by Muthu Kumaran (@mkumaran) on CodePen.
Demo looks great but now I want to move completed items below and active items to top. So that it's easy to manage the Todo App Task list. To bring the active items top, let's sort the lists by isComplete: false
Now we need to filter or sort the data without mutating the lists data object. Let's create an another method to filter the data but this method should go inside computed property.
Why Computed property instead of Methods?
It's better to read it from Vue docs, Computed Properties
The main reason to go with computed property is "computed properties are cached based on their dependencies". We can still define the same method to Methods property but when template rendered each time, the method will execute each time. A computed property will only re-evaluate when some of its dependencies have changed. As long as
Let's update the JS and add computed property
        data: {
          ...
        },
        computed: {
          filterLists: function(){
            return _.orderBy(this.lists, ['isComplete', false])
          }
        },
        methods:{
          ...
        }
filterLists methods will return sorted list with active at top and completed items at the bottom.
I'm using lodash library to perform array manipulation. _.orderBy will return sorted lists
Make sure you include lodash library before testing the code,
<script src="https://cdn.jsdelivr.net/lodash/4.17.4/lodash.min.js"></script>
To make this work, we need to make one more change in the markup. We need to change v-for loop which uses lists to iterate
          //Change
          <li v-for="list in lists" :key="list.id">

            to

          //replace `lists` with `filterLists`
          <li v-for="list in filterLists" :key="list.id">
Here's the codepen demo to test it out. Try adding more Todo items and check the checkbox to see the magic,
See the Pen Mark as Complete with sort - Demo Todo App - Vue.js by Muthu Kumaran (@mkumaran) on CodePen.
Next is, we are going to delete a Todo item. Let's add the below delete icon in the markup
<span class="remove" v-on:click="removeTask(list)">x</span>
removeTask - method will remove todo item from lists data object.
          methods:{
            ...
            ...
            removeTask: function(list){
              var index = _.findIndex(this.lists, list);
              this.lists.splice(index, 1);
            }
          }
Check out the codepen for deleting a Todo item,
See the Pen Remove Item - Demo Todo App - Vue.js by Muthu Kumaran (@mkumaran) on CodePen.
Finally, we have a built a simple Todo App using Vue.js. Here's the complete HTML, CSS, and JavaScript to play around.
HTML/CSS
See the Pen Todo App - Vue.js by Muthu Kumaran (@mkumaran) on CodePen.
JavaScript
See the Pen Todo App - Vue.js by Muthu Kumaran (@mkumaran) on CodePen.
Final Demo
See the Pen Todo App - Vue.js by Muthu Kumaran (@mkumaran) on CodePen.
In next article, I'll show you how to use Components and State Management with the same Todo App. Once I complete the write-up, I'll share the link here.
Continue to read Part 2 here, Vue.Js - Todo App UUsing Vuex - PART 2.
If you like this, please share
Comments
Thank you for visiting my page. Please shares your views and suggestion in the comment box below.